

This guide will show you how to disassemble and calibrate the Xhorse Condor XC-003 clamp.
1.Xhorse Condor XC-003 Clamp disassemble Guide:
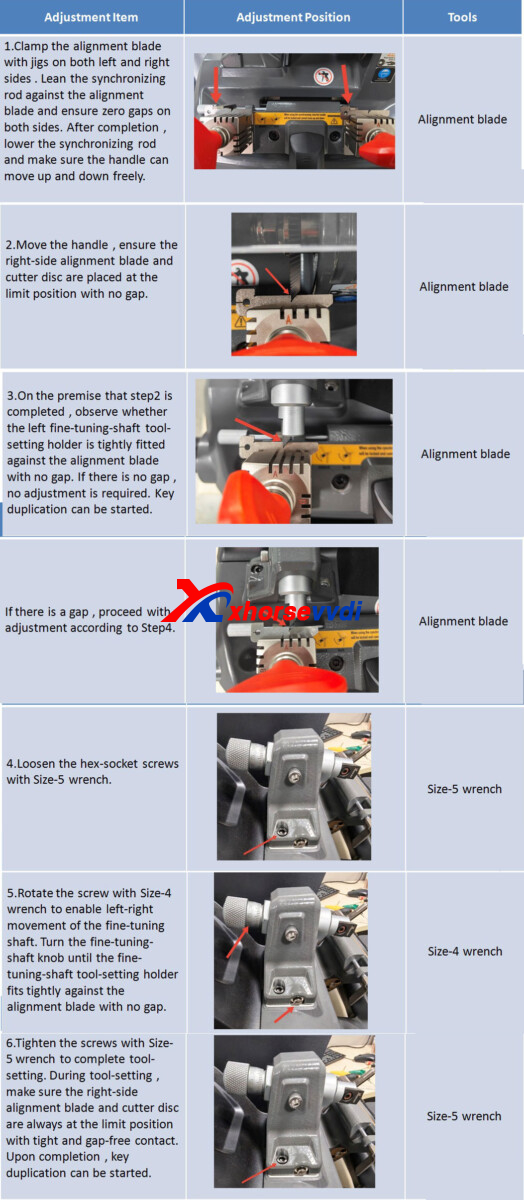
1). Clamp the alignment blade with jigs on both left and right sides. Lean the synchronizing rod against the alignment blade and ensure zero gaps on both sides. After completion, lower the synchronizing rod and make sure the handle can move up and down freely.
2). Move the handle, ensure the right-side alignment blade and cutter disc are placed at the limit position with no gap.
3). On the premise that Step 2 is completed, observe whether the left fine-tuning-shaft tool-setting holder is tightly fitted against the alignment blade with no gap. If there is no gap, no adjustment is required. Key duplication can be started.
If there is a gap, proceed with adjustment according to Step 4.
4). Loosen the hex-socket screws with Size-5 wrench.
5). Rotate the screw with Size-4 wrench to enable left-right movement of the fine-tuning shaft. Turn the fine-tuning-shaft knob until the fine-tuning-shaft tool-setting holder fits tightly against the alignment blade with no gap.
6). Tighten the screws with Size-5 wrench to complete tool-setting. During tool-setting, make sure the right-side alignment blade and cutter disc are always at the limit position with tight and gap-free contact. Upon completion, key duplication can be started.
2.Xhorse Condor XC-003 Clamp Calibrate Guide:
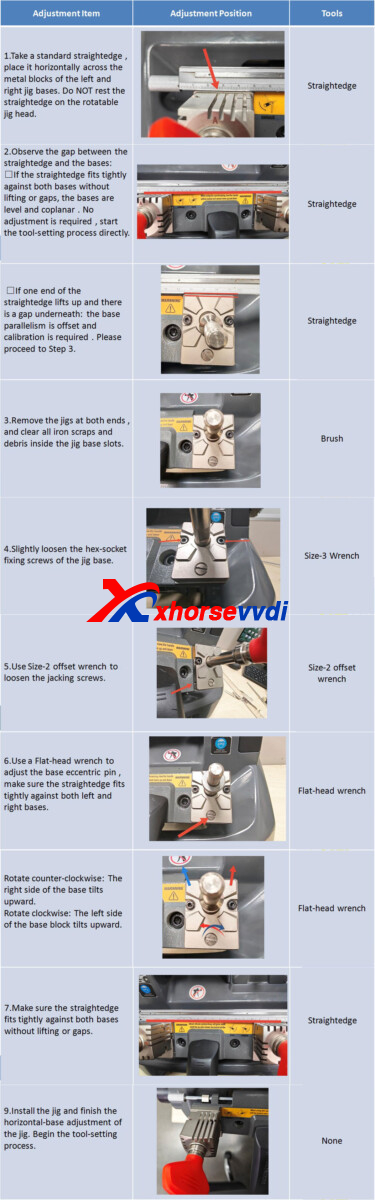
1).Take a standard straightedge, place it horizontally across the metal blocks of the left and right jig bases. Do NOT rest the straightedge on the rotatable jig head.
2).Observe the gap between the straightedge and the bases:
– If the straightedge fits tightly against both bases without lifting or gaps, the bases are level and coplanar. No adjustment is required. Start the tool-setting process directly.
– If one end of the straightedge lifts up and there is a gap underneath, the base parallelism is offset and calibration is required. Please proceed to Step 3.
3).Remove the jigs at both ends, and clear all iron scraps and debris inside the jig base slots.
4).Slightly loosen the hex-socket fixing screws of the jig base.
5).Use Size-2 offset wrench to loosen the jacking screws.
6).Use a Flat-head wrench to adjust the base eccentric pin, making sure the straightedge fits tightly against both left and right bases.
-Rotate counter-clockwise: The right side of the base tilts upward.
-Rotate clockwise: The left side of the base block tilts upward.
7).Make sure the straightedge fits tightly against both bases without lifting or gaps.
8).Install the jig and finish the horizontal-base adjustment of the jig. Begin the tool-setting process.
Skype: xhorsevvdi.com
Whatsapp: https://wa.me/8613983756354


 Whatsapp:

 Skype: